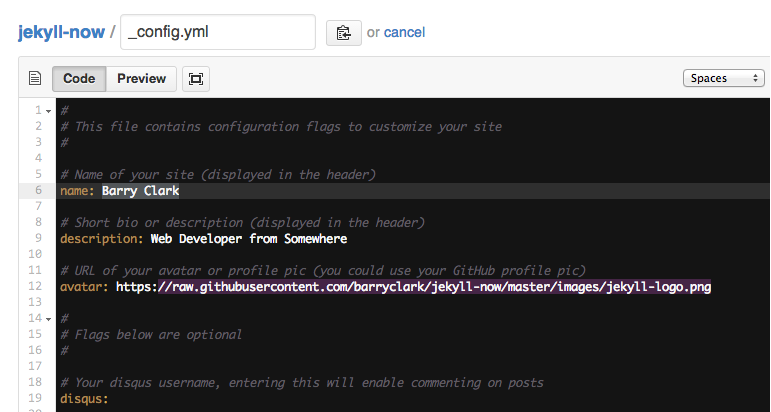
<?xml version="1.0" encoding="utf-8"?><feed xmlns="http://www.w3.org/2005/Atom" ><generator uri="https://jekyllrb.com/" version="3.10.0">Jekyll</generator><link href="https://khalidkhan020.github.io/feed.xml" rel="self" type="application/atom+xml" /><link href="https://khalidkhan020.github.io/" rel="alternate" type="text/html" /><updated>2026-09-29T19:14:59+00:00</updated><id>https://khalidkhan020.github.io/feed.xml</id><title type="html">Khalid Khan</title><subtitle>Mobile Architect</subtitle><entry><title type="html">You’re up and running!</title><link href="https://khalidkhan020.github.io/Hello-World/" rel="alternate" type="text/html" title="You’re up and running!" /><published>2014-03-03T00:00:00+00:00</published><updated>2014-03-03T00:00:00+00:00</updated><id>https://khalidkhan020.github.io/Hello-World</id><content type="html" xml:base="https://khalidkhan020.github.io/Hello-World/"><![CDATA[<p>Next you can update your site name, avatar and other options using the _config.yml file in the root of your repository (shown below).</p>

<p><img src="/images/config.png" alt="_config.yml" /></p>

<p>The easiest way to make your first post is to edit this one. Go into /_posts/ and update the Hello World markdown file. For more instructions head over to the <a href="https://github.com/barryclark/jekyll-now">Jekyll Now repository</a> on GitHub.</p>]]></content><author><name></name></author><summary type="html"><![CDATA[Next you can update your site name, avatar and other options using the _config.yml file in the root of your repository (shown below).]]></summary></entry><entry><title type="html">You’re up and running!</title><link href="https://khalidkhan020.github.io/Hello-World3/" rel="alternate" type="text/html" title="You’re up and running!" /><published>2014-03-03T00:00:00+00:00</published><updated>2014-03-03T00:00:00+00:00</updated><id>https://khalidkhan020.github.io/Hello-World3</id><content type="html" xml:base="https://khalidkhan020.github.io/Hello-World3/"><![CDATA[<p>Next you can update your site name, avatar and other options using the _config.yml file in the root of your repository (shown below).</p>

<p><img src="/images/config.png" alt="_config.yml" /></p>

<p>The easiest way to make your first post is to edit this one. Go into /_posts/ and update the Hello World markdown file. For more instructions head over to the <a href="https://github.com/barryclark/jekyll-now">Jekyll Now repository</a> on GitHub.</p>]]></content><author><name></name></author><summary type="html"><![CDATA[Next you can update your site name, avatar and other options using the _config.yml file in the root of your repository (shown below).]]></summary></entry><entry><title type="html">How to use Native Android functions in React Native (ie. Native Bridging)</title><link href="https://khalidkhan020.github.io/Hello-World4/" rel="alternate" type="text/html" title="How to use Native Android functions in React Native (ie. Native Bridging)" /><published>2014-03-03T00:00:00+00:00</published><updated>2014-03-03T00:00:00+00:00</updated><id>https://khalidkhan020.github.io/Hello-World4</id><content type="html" xml:base="https://khalidkhan020.github.io/Hello-World4/"><![CDATA[<p>Hello guys Today we will discuss how we can expose Android Native functions for React Native. Regardless of a lot of theories<br />
we will discuss only os steps–</p>

<h2 id="follow-bellow-steps-to-expose-a-function-for-java-script">Follow Bellow Steps to expose a function for Java Script</h2>

<ol>
  <li>Open Android project in android studio</li>
  <li>Create a Function Container Java Class with he help of ReactContextBaseJavaModule Class in your Android Package</li>
  <li>Create React Package with he help of ReactPackage Class in your Android Package</li>
  <li>Register your package</li>
</ol>

<h3 id="lets-discuss-each-step-one-by-one">Lets discuss each step one by one</h3>

<h4 id="1-open-android-project-in-android-studio">1. Open Android project in android studio</h4>

<h4 id="follow-these-steps">Follow these steps</h4>
<p>a. Simply open android Studio
b. Click on File Menu 
c. Click on Open 
d. Open android folder of your React Native Project</p>]]></content><author><name></name></author><summary type="html"><![CDATA[Hello guys Today we will discuss how we can expose Android Native functions for React Native. Regardless of a lot of theories we will discuss only os steps–]]></summary></entry></feed>